Porcelain Laminate Veneers on a Vital and Non-Vitalabraded Maxillary Central Incisors: A Case Report
Porcelain laminate veneers (PLV) also known as “contact lens,” are the most esthetic and conservative restoration to create a more pleasing and beautiful smile. Present Case report describes and discusses the use of ceramic veneers for anesthetic and functional restoration of two maxillary incisor with abraded edges , and one was non vital and discoloured. They necessitate color and morphology changes planning in order to overlap the incisal edges and prepare into the lingual aspect of the tooth. The patient was very satisfied with the result and had no complaints during 2 years of follow-up.
Introduction
The maxillary central incisors are the teeth that are most commonly affected by trauma and par functional habits, abrasion and dental erosion. Enamel and dentine fractures are the most common types of traumatic dental injuries to permanent anterior teeth [1]. Currently, Ceramic veneers, are a conservative mean to provide excellent esthetics for restoration of malformed, discoloured, misaligned, traumatized, fractured, diastema, worn anterior teeth, replace old composite restorations and can reproduce the characteristics of the tooth structure [2, 3]. The rehabilitation procedure with porcelain veneers has been widely welcomed by the patients [4]. Improvements in dental materials have made ceramic a desirable option for indirect esthetic restorative Procedures [5, 6]. Magne & Belser [7] presented the following classification for indications for ceramic veneers: Type I: Teeth resistant to bleaching Type IA: Tetracycline discoloration Type IB: Teeth that are unresponsive to bleaching Type II: Major morphologic modifications Type IIA: Conoid teeth Type IIB: Diastema or interdental triangles to be closed Type IIC: Augmentation of incisal length or facial prominence Type III: Extensive restorations Type IIIA: Extensive coronal fracture Type IIIB: Extensive loss of enamel by erosion and wear Type IIIC: Generalized congenital malformations [7].
After deciding the treatment of choice, it is important to maintain the remaining tooth structure, restore the occlusion immediately, and prevent over eruption of opposing incisors. Porcelain laminate veneers require a minimal amount of tooth preparation, approximately 0.5 mm to 0.7mm of surface enamel reduction. Therefore it is considered as more conservative restoration than a crown, which requires significant removal of sound tooth structure [8].
Case Report
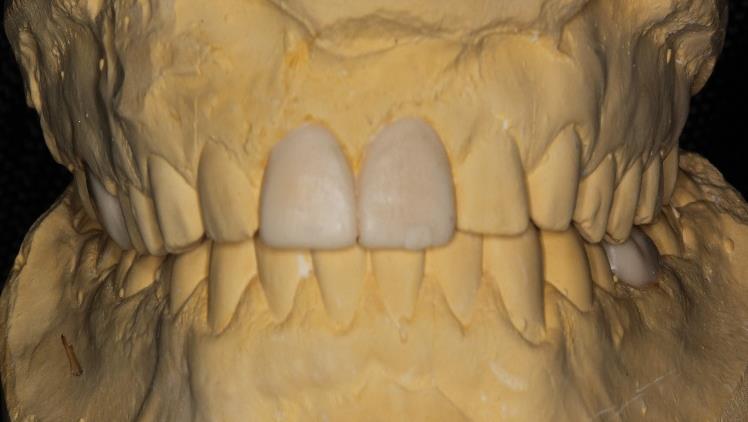
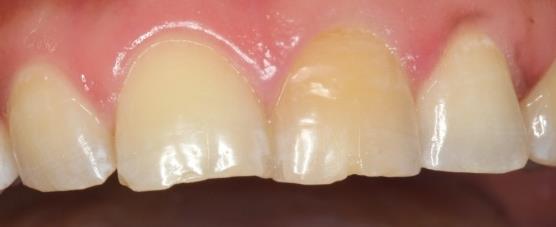
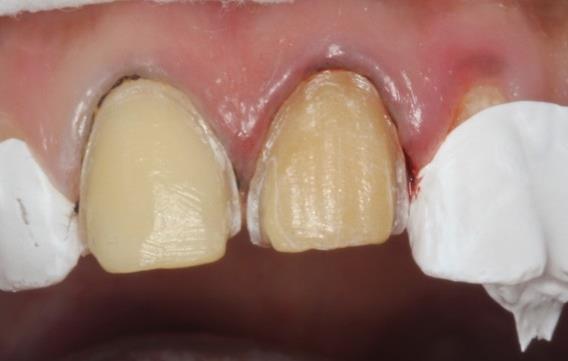
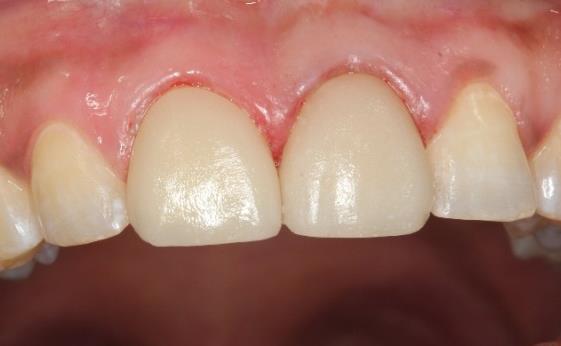
A 28 years old male patient reported to Prince Abdurrahman Advanced Dental Institute, with a chief complaint of abraded and discoloured anterior teeth. The patient was unhappy with the appearance of his teeth and he was displeased with his smile. A detailed family history, medical history and dental history was obtained. In family history, none of his family members had similar problem. Medical history was also not relevant. Extra oral examination could elicit no abnormal findings. Nevertheless, Intra-oral examination showed an average lip line exposing the maxillary teeth and only the inter dental papillae. It revealed an abraded coronal edge of tooth no. 11and 21 and the maxillary left incisor exhibited yellowish to brownish discoloration of the labial surface (Figure 1-3).
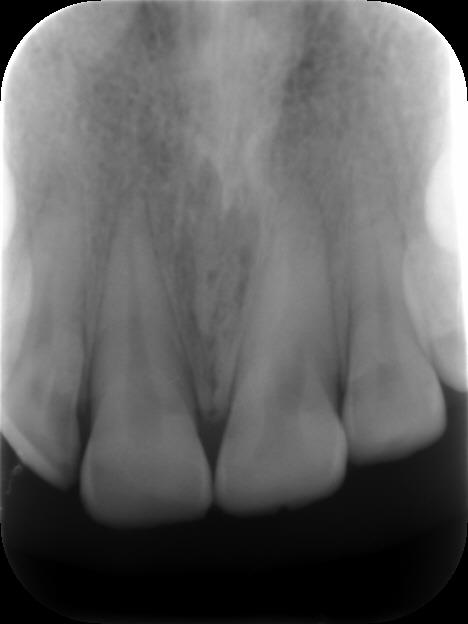
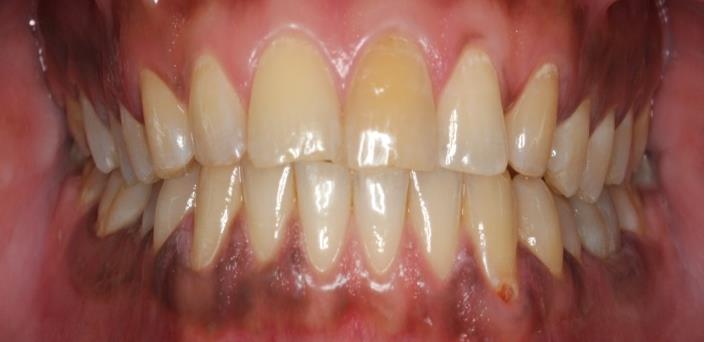
The patient gave a history of Para functional habits (eat seeds on incisors). The vitality test revealed the tooth #21 was non-vital. Endodontic treatment has not been carried out because the 2/3 apical of the canal were calcified (Figure 3) and were unable to be negotiated and the patient refused retrograde RCT by endodontic surgery ll.
The glass-ceramic lithium disilicate was used (IPSe.max Press, Ivoclar Vivadent). The tooth preparation was carried out according to the standard principles for tooth preparation required for veneer preparation for the ceramic veneering. A minimal preparation of 0.5 mm was used to allow a place for veneers, be able to adequately mask unaesthetic areas, and/or change the color, as well as provide the minimal strength needed for the fabrication and delivery of the PLV [9, 10]. The facial surface was prepared with a tapered round- ended diamond bur (no. 2135, KG Sorensen) to achieve an uniform preparation depth of 0.5 mm in two planes along the longitudinal axis of the tooth and on the same time to determine the margin of the cervical region of the tooth. The controlled reduction of tooth labial surface is critical ,using cuthorizontal grooves 0.5 mm depth marked with a lead pencil (to protect against over reduction) or silicone putty index which was derived from the wax-up to allow achieving the form and contours of the preplanned shape and length of the final veneer. The chamfer margin was placed slightly subgingivally to mask the dark staining in the cervical region and to improve esthetic and emergence profile of the tooth (Figure 5).
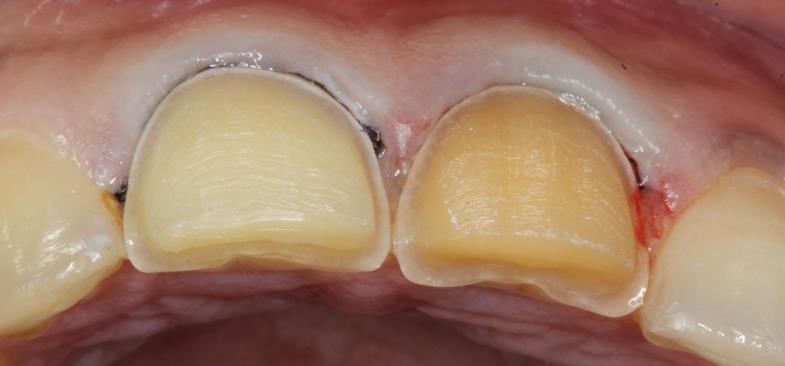
Figure 5: Labial preparation with finish line subgingival. The preparation of the incisal edge, was performed about 2 mm reduction. The preparation was extended to the lingual surface to give wrapped-around preparation geometry to cover the abraded incisal edge with restoration (Figure 6). The desired esthetic change was carried out in tooth form and in color and it was necessary to overlap the incisal edge, because there was sufficient buccolingual width.
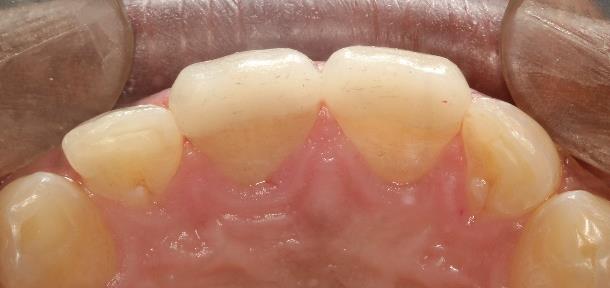
![Figure 6: Wrapped-around preparation of the incisal edge. The main rule to respect is to avoid the palatal extension of the preparation in the zone of palatal concavity. That part of the palatal surface is the place of the maximum tensile stresses generated during loading. For moderate crown fracture that involved incisal one third, it was recommended to make butt margin which limited the extension of the ceramic and reduced the amount of stress at tooth/veneer interface [11]. In addition, a horizontal butt margin is correct choice for fractured teeth, especially from the aspect of future adhesive bonding, which would be obtained with enamel. The overlapped incisal edge preparation is useful in circumstances where it is necessary to change the tooth dimensions or to protect part of the palatal surface. The finish line should be minimum 1mm away from centric contacts. The veneer extended onto the lingual surface will enhance mechanical retention and increase the surface area for bonding [4]. Preparation of the proximal area is crucial and care must be taken to ensure that the restoration–tooth interface is hidden. The adjacent tooth was protected with a metal matrix. The chamfer finish line was placed as lingually as permitted by the tooth anatomy and the preparation was stopped just short of the interproximal contact. Temporary restoration was done (Figure 7) with light cured composite resin or by resin acryl using the silicone index. It aimed to protect dental tissues and re- establish tooth shape and it was bonded to the teeth only at 2 to 3 spots with composite resin.](/fulltextimages/2204/fig_6.jpeg)
Figure 6: Wrapped-around preparation of the incisal edge. The main rule to respect is to avoid the palatal extension of the preparation in the zone of palatal concavity. That part of the palatal surface is the place of the maximum tensile stresses generated during loading. For moderate crown fracture that involved incisal one third, it was recommended to make butt margin which limited the extension of the ceramic and reduced the amount of stress at tooth/veneer interface [11]. In addition, a horizontal butt margin is correct choice for fractured teeth, especially from the aspect of future adhesive bonding, which would be obtained with enamel. The overlapped incisal edge preparation is useful in circumstances where it is necessary to change the tooth dimensions or to protect part of the palatal surface. The finish line should be minimum 1mm away from centric contacts. The veneer extended onto the lingual surface will enhance mechanical retention and increase the surface area for bonding [4]. Preparation of the proximal area is crucial and care must be taken to ensure that the restoration–tooth interface is hidden. The adjacent tooth was protected with a metal matrix. The chamfer finish line was placed as lingually as permitted by the tooth anatomy and the preparation was stopped just short of the interproximal contact. Temporary restoration was done (Figure 7) with light cured composite resin or by resin acryl using the silicone index. It aimed to protect dental tissues and re- establish tooth shape and it was bonded to the teeth only at 2 to 3 spots with composite resin.
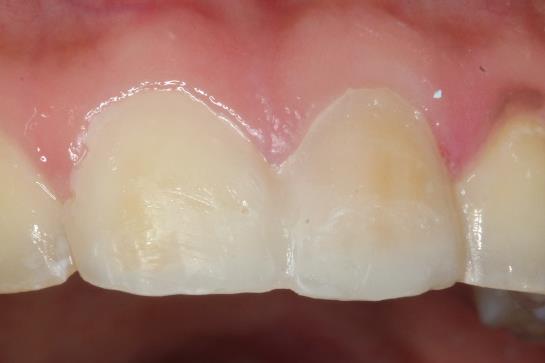
Figure 7: Temporary restorations. Gingival displacement was obtained using retraction cords (#000 and #00, Ultradent) and the impression was made with polyvinylsiloxane by putty-wash technique after removing retraction cords and the impression was checked and poured with die stone. Ceramic shade was selected as 3 L 1.5 prior to the preparation intended for the veneers. The veneers were fabricated in the lab using pressing technique (Ips-emax ingots). After removing the temporary veneers, the teeth were cleaned and washed with water or slurry of fine flour of pumice and were dried. The porcelain veneers were tried on to the teeth with selected shade of try in paste to verify their color and fit (Variolink Veneer Try-In Amherst, USA)) that simulated the final shade of restorations. Functional occlusion was controlled to verify the anterior guidance with absence of interferences. After completion of the try- in stage and determination of the cement color a gingival retraction cord was used to prevent contamination by gingival fluid. The inner surfaces of the veneers were etched with 9.5% hydrofluoric acid for 20 second and salinized with a silane coupling agent (Monobond Plus, Ivoclar Vivadent). The teeth surface were etched for 20 seconds with37% phosphoric acid then rinsed for 20 seconds.
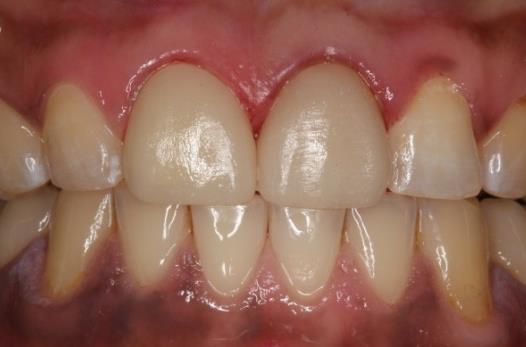
(a) (b) Figure 10: a) Final cementation buccal view. b) Final cementation buccal view. Discussion Esthetic treatment of discoloured anterior teeth presents a challenge in clinical practice. Minimally The veneer was covered with a glycerin gel as an oxygen barrier to ensure better polymerization of the resin cement. A thin layer of photo-cure resin cement (Variolink Veneer, Ivoclar Vivadent) was applied at the intaglio surfaces. The veneers were placed on the prepared teeth and pressed slightly with the fingers .light polymerization was carried out on both surfaces for 40seconds. Excess cement were removed and interproximal cement was removed with a micro brush and dental floss. The marginal area were polished by abrasive disc (Figures 8-10).
invasive dentistry entails removal of minimal amount of healthy tissues and adopts a philosophy that integrates minimal intervention for the placement and replacement of restorations [12]. Rehabilitation procedure with porcelain veneers are less invasive, for both hard and soft tissues and provide an excellent and predictable esthetic outcome. A study conducted by Brunton PA, et al. [13] related to tooth preparation techniques for porcelain laminate veneers concluded that consideration should be given to the use of a silicone index or depth gauge bur when teeth are prepared for porcelain laminate veneers [13]. The cervical preparation for a veneer is recommended to be a chamfer design with a maximum depth of0.4mm. This allows the veneer to reproduce natural tooth contours and not be over-contoured [14]. There is no classification system categorizing the extent of preparation for different veneer treatments. The lack of veneer preparation classifications creates misunderstanding and miscommunication with patients and within the dental profession [15]. Due to the likelihood of the margin being in enamel, there is less chance of microleakage associated with enamel bonding. Subgingival margins may be required when there are caries or previous restorations extending sub-gingivally [16, 17, 18, 19]. Tooth preparation design, especially incisal edge design, continues to be one of the most controversial aspects of porcelain veneers. The results of 7-year long-term survival of 110 porcelain veneers with and without incisal porcelain coverage, published in 2004, did not indicate the statistically significant differences between the different approach in preparation design [20]. Sorensen, et al. [21] have reported that if more than 50% of the intact enamel surface area has been lost due to excessive decay or the application of access preparations for endodontic treatment, laminate veneer restorations would have some limitations with respect to retention and resistance [21]. The most frequently used treatment for discoloured teeth involves laminates, which mask or reduce the discoloration [22, 23]. A number of clinical studies have concluded that bonded laminate veneer restorations delivered good results over a period of 10 years and more [24, 25]. The requirement to reduce the incisal edge has recently been questioned in two studies, which reported equivalent longevity for porcelain laminate veneers with and without incisal overlap [26, 15]. It is suggested, however, that until further evidence is forthcoming the incisal edge be reduced when teeth are prepared for porcelain laminate veneers [27]. Diagnostic wax-up mock- up techniques are great tools during clinical evaluation and treatment planning, once they provide information on the possibility of using porcelain laminate veneers with minimal or no dental wear [28]. Patients with bruxism or tooth-to-foreign object contact may not be ideal candidates for veneers. In cases of minor incisal wear owing to bruxism, it is often possible to restore the incisal length using PLV. It is very important to evaluate the occlusal scheme and manage the occlusal forces before any treatment with PLV is attempted [29]. Some freehand preparation of severely discoloured teeth will still be required, so as to ensure a successful esthetic outcome, with an increased thickness of porcelain and/or luting cement in the final restoration having a greater masking ability [30]. Despite the success of Porcelain veneer as good conservative and esthetic treatment option however, due to its minimal thickness, Veneers have limited discoloration masking capability changes [31]. In addition they have limitations, such as sever discolorations or extensive carious lesions, in similar situations full coverage crowns should be indicated.
Conclusion
Porcelain laminate veneers used for wrapped-around preparation of the incisal edges provide an excellent esthetic outcome involving color and morphology modifications to create a life-like teeth appearance with pleasant smile.
References
-
Anchieta RB, Rocha EP, Watanabe MU, de Almeida EO, Freitas-Junior AC, et al. (2012) Recovering the function and esthetics of fractured teeth using several restorative cosmetic approaches. Three clinical cases. Dent Traumatol 28(2): 166-172.
-
Anusavice KJ (1992) Degradability of dental ceramics. Adv Dent Res 6: 82-89.
-
Freire A, Archegas LR (2010) Porcelain laminate veneer on a highly discoloured tooth: a case report. J Can Dent Assoc 76: a126.
-
Romesh Soni, Rajul Vivek (2015) Esthetic rehabilitation by porcelain laminates - A case report. International Journal of Applied Dental Sciences 1(4): 98-100.
-
Walter RD, Raigrodski AJ (2008) Critical appraisal: clinical considerations for restoring mandibular incisors with porcelain laminate veneers. J Esthet Restor Dent 20(4): 276-281.
-
Guess PC, Stappert CF, Strub JR (2006) Preliminary clinical results of a prospective study of IPS e.max Press- and Cerec ProCAD- partial coverage crowns. Schweiz Monatsschr Zahnmed 116(5): 493-500.
-
Magne P, Belser UC (2002) Bonded Porcelain Restorations in the Anterior Dentition-a Biomimetic Approach. Chicago: Quintessence Publishing.
-
Peumans M, Van Meerbeek B, Lambrechts P, Vanherle G (2000) Porcelain veneers: a review of the literature. J Dent 28(3): 163-177.
-
Radz GM (2011) Minimum thickness anterior porcelain restorations. Dent Clin North Am 55(2): 353-370.
-
Wells DJ (2010) “No-prep” veneers. Inside Dent 6(8): 56-60.
-
Magne P, Douglas WH (1999) Optimization of resilience and stress distribution in porcelain veneers for the treatment of crown-fractured incisors. Int J Periodontics Restorative Dent 19(6): 543-553.
-
White JM, Eakle WS (2000) Rationale and treatment approach in minimally invasive dentistry. J Am Dent Assoc 131: 13S-19S.
-
Brunton PA, Aminian A, Wilson NH (2000) Restorative dentistry: Tooth preparation techniques for porcelain laminate veneers. Br Dent J 189(5): 260- 262.
-
Kamble VD, Parkhedkar RD (2011) Porcelain veneers: Treatment guidelines for optimal aesthetics. Contemporary Clinical Dentistry 4: 124.
-
Le Sage B (2013) Establishing a classification system and criteria for veneer preparations. Compend Contin Educ Dent 34(2): 104-112.
-
Kenneth WA, Barry GD (2001) A clinical approach to techniques and materials. 2nd [Edn.], St Louis: Mosby 2001: 151-185.
-
Magne P, Belser U (2003) Bonded porcelain restorations in the anterior dentition: A Biomimetic Approach. Germany: Quintessence.
-
Calamia JR, Calamia CS (2007) Porcelain laminate veneers: reasons for 25 years of success. Dent Clin North Am 51(2): 399-417.
-
Abu-Hussein Muhamad, Watted Nezar, Abdulgani Azzaldeen (2015) The Curve of Dental Arch in Normal Occlusion. Open Science Journal of Clinical Medicine 3(2): 47-54.
-
Smales RJ, Etemadi S (2004) Long-term survival of porcelain laminate veneers using two preparation designs: A retrospective study. Int J Prosthodont 17(3): 323-332.
-
Sorensen (2015) The modified laminate veneer restoration with combined restoration on traumatic teeth (case report). J Dent Fac Atatürk Uni 25(2): 238- 242.
-
Aristidis GA, Dimitra B (2002) Five-year clinical performance of porcelain laminate veneers. Quintessence Int 33(3): 185-189.
-
Fradeani M, Redemagni M, Corrado M (2005) Porcelain laminate veneers: 6- to 12-year clinical evaluation — a retrospective study. Int J Periodontics Restorative Dent 25(1): 9-17.
-
Layton DM, Walton TR (2012) The up to 21-year clinical outcome and survival of feldspathic porcelain veneers: accounting for clustering. Int J Prosthodont 25(6): 604-612.
-
Layton D, Walton T (2007) An up to 16-year prospective study of 304 porcelain veneers. Int J Prosthodont 20(4): 389-396.
-
Gurel G, Sesma N, Calamita MA, Coachman C, Morimoto S (2013) Influence of enamel preservation on failure rates of porcelain laminate veneers. Int J Periodontics Restorative Dent 33(1): 31-39.
-
Abu-Hussein Muhamad , Mai Abdulgani, Jabareen Ayah, Shehadee Ameer, Azzaldeen Abdulgani (2017) Porcelain laminates: the Future of Esthetic Dentistry. Journal of Dental and Medical Sciences 16(5): 68-75.
-
Vanlıoğlu BA, Kulak-Özkan Y (2014) Minimally invasive veneers: current state of the art. Clin Cosmet Investig Dent 6: 101-107.
-
Chen JH, Shi CX, Wang M, Zhao SJ, Wang H (2005) Clinical evaluation of 546 tetracycline-stained teeth treated with porcelain laminate veneers. J Dent 33(1): 3-8.
-
Dozic A, Tsagkari M, Khashayar G, Aboushelib M (2010) Color management of porcelain veneers: influence of dentin and resin cement colors. Quintessence Int 41(7): 567-573.
-
Mizrahi B (2007) Porcelain veneers: techniques and precautions. Int Dent SA 9(6): 6-16.
- Diagnosis and Management of Mental Nerve Paresthesia Secondary to Apical Periodontitis of Mandibular Second Premolar: A CBCT Based Case Report
- A Randomized, Double Blinded Clinical Trial to Compare the Effect of Oral Premedication (Diclofenac Potassium or Dexamethasone) on Post-Operative Pain Following Pulpectomy
- Modified Lip Repositioning Technique for the Management of Excessive Gingival Display
- Integral Role of Non-Dental Providers and Fluoride Dissemination
- Root Canal Treatment Rate in Deciduous Teeth Among 6-Year- Olds in the Era of Discontinuing Water Fluoridation - Historical Cohort Study
- The Impact of the Notch1 on the Migratory Capacity and the Expression of E-Cadherin and CyclinD1 in Ameloblastoma Cells